Difference between revisions of "Configuration and Setup"
From Smartbilling
(→** Configuration and Setup first steps. **) |
|||
| Line 10: | Line 10: | ||
[[ File:LoginScreen.png | frameless | Welcome-Login Screen shot ]] | [[ File:LoginScreen.png | frameless | Welcome-Login Screen shot ]] | ||
| − | + | If you don’t remember your password, please click on the "Forgot password?" link just below the password field. You will be prompted to enter your username. Enter it and then press [Submit]. The new password will be sent to you by email. | |
# Introduction of the default view of the system | # Introduction of the default view of the system | ||
| Line 20: | Line 20: | ||
# User profile support | # User profile support | ||
| − | If you press on the | + | If you press on the "Profile" button, you will be able to edit your profile. |
| − | You can change your name, Language preferences, phone number or your avatar from the main window. Once you finish with the editing, press | + | You can change your name, Language preferences, phone number or your avatar from the main window. Once you finish with the editing, press [Save] to preserve the changes. |
| − | On the right side of the | + | On the right side of the "User profile" are located the additional Profile settings. |
# Change Password | # Change Password | ||
| − | You can press on the | + | You can press on the "Change Password" if you want to change it. You must enter your current password and the new one (and to confirm it). Because of security reasons, some limitations applied: at least 6 symbols in length, at least one letter and one digit. Press [Save] in order to save the changes. |
In any case, if you have some changes done, but try to close the profile screen, you will be prompted for the unsaved changes. | In any case, if you have some changes done, but try to close the profile screen, you will be prompted for the unsaved changes. | ||
| Line 39: | Line 39: | ||
# Calls | # Calls | ||
| − | In case of integration with the PBX, you can find there the list of your calls. You can add a View, based on your wish, by pressing on | + | In case of integration with the PBX, you can find there the list of your calls. You can add a View, based on your wish, by pressing on "View/+New View". You can also do a search, based on more criteria, by clicking on the arrow, next to the search box. You can sort your list by each column, by pressing on the column name. This is valid for all the tables in the system. |
# Email Settings | # Email Settings | ||
| Line 53: | Line 53: | ||
As a modern system, our billing solution supports widgets. Using this menu, you can add, delete or edit different widgets. This is an easy way to access your most wanted functionalities, without to be necessary to navigate across the menu. | As a modern system, our billing solution supports widgets. Using this menu, you can add, delete or edit different widgets. This is an easy way to access your most wanted functionalities, without to be necessary to navigate across the menu. | ||
| − | The default widget for new users is the | + | The default widget for new users is the "Home" widget with calendar inside. |
| − | In order to edit this widget, click on the name and you will see all the available options. You can change the name; the layout, according to your needs and to drag ’n drop from (or to) the list of the available widgets. Once you finish, press on the Save button. From wherever in the billing system, you can go to your available widget, by pressing on the | + | In order to edit this widget, click on the name and you will see all the available options. You can change the name; the layout, according to your needs and to drag ’n drop from (or to) the list of the available widgets. Once you finish, press on the Save button. From wherever in the billing system, you can go to your available widget, by pressing on the SmartBilling logo on the left top corner. If you want to delete an existent widget, just mark it and press on the Delete button. |
__ [[ SmartBilling Documentation home-page | Home ]] __ | __ [[ SmartBilling Documentation home-page | Home ]] __ | ||
Revision as of 23:59, 25 April 2016
** Configuration and Setup first steps. **
- Login to the system
On the snapshot below is shown the typical login screen of the Smartbilling system.
You have to enter your Username (the email address assigned to your account) and the password.
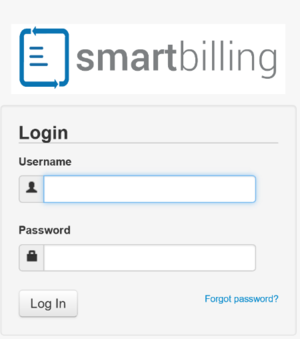

If you don’t remember your password, please click on the "Forgot password?" link just below the password field. You will be prompted to enter your username. Enter it and then press [Submit]. The new password will be sent to you by email.
- Introduction of the default view of the system
Once you’re logged in, you will see the default view of the system
In the right corner, just next to the avatar, you will see your username (the email address) and the company name. By pressing on the username, you can choose either to edit your profile or logout from the system.
- User profile support
 If you press on the "Profile" button, you will be able to edit your profile.
 You can change your name, Language preferences, phone number or your avatar from the main window. Once you finish with the editing, press [Save] to preserve the changes.
On the right side of the "User profile" are located the additional Profile settings.
# Change Password
You can press on the "Change Password" if you want to change it. You must enter your current password and the new one (and to confirm it). Because of security reasons, some limitations applied: at least 6 symbols in length, at least one letter and one digit. Press [Save] in order to save the changes.
In any case, if you have some changes done, but try to close the profile screen, you will be prompted for the unsaved changes.
You can either confirm that you want to leave the screen or to go back and save the changes, before to leave.
- Downloads
There you can find all the downloaded files – saved or temporary
- Calls
In case of integration with the PBX, you can find there the list of your calls. You can add a View, based on your wish, by pressing on "View/+New View". You can also do a search, based on more criteria, by clicking on the arrow, next to the search box. You can sort your list by each column, by pressing on the column name. This is valid for all the tables in the system.
- Email Settings
By entering this option, you can edit your email settings: enable or disable the scan email feature, enable or disable the notifications by email and add or edit your signature. Our system allows you to send or receive emails directly through it. Do not forget to save the changes, once you finish!
- My Scheduled Reports
Here is located the list of your scheduled reports. You can delete some reports, by marking the report and pressing the Delete button on the top left corner
- Widgets
As a modern system, our billing solution supports widgets. Using this menu, you can add, delete or edit different widgets. This is an easy way to access your most wanted functionalities, without to be necessary to navigate across the menu.
The default widget for new users is the "Home" widget with calendar inside.
In order to edit this widget, click on the name and you will see all the available options. You can change the name; the layout, according to your needs and to drag ’n drop from (or to) the list of the available widgets. Once you finish, press on the Save button. From wherever in the billing system, you can go to your available widget, by pressing on the SmartBilling logo on the left top corner. If you want to delete an existent widget, just mark it and press on the Delete button.
__ Home __