Difference between revisions of "Accounts"
| (8 intermediate revisions by 2 users not shown) | |||
| Line 2: | Line 2: | ||
<u>[[SmartBilling FAQ page|FAQ page]]</u> | <u>[[SmartBilling FAQ page|FAQ page]]</u> | ||
<u>[[SmartBilling 5.0 pages|SmartBilling 5.0]]</u> | <u>[[SmartBilling 5.0 pages|SmartBilling 5.0]]</u> | ||
| + | |||
== Accounts == | == Accounts == | ||
| − | + | The navigation on the Customer Account List View screen is rich. | |
| + | The UI screen has two search boxes: (1) a ‘global’ search bar that does a general search within the entire SmartBilling database, and (2) a ‘local’ search bar that is limited to the displayed list of accounts. | ||
| − | [[File: | + | |
| + | [[File:Customer accounts.png|800px]] | ||
| + | |||
| + | |||
| + | Within the displayed list, you can view individual customers by clicking on the blue ‘Account #’ values; you can also delete customers if no transactions have been created for them (e.g. posted invoices, payments, credit notes, etc.) by clicking the ‘x’ icon to the right of the account row. | ||
| + | |||
| + | |||
| + | [[File:Customer_Account_Info.png|800px]] | ||
| + | |||
| + | You can also configure the account information that you collect and store by adding custom fields. SmartBilling adapts to your business needs and allows you to add custom fields to most objects that SmartBilling defines. You can configure the accounts fields that are important for your business and manage them. | ||
Let´s look at the most important functionalities starting with the Customer Configuration: | Let´s look at the most important functionalities starting with the Customer Configuration: | ||
| − | <center><u>[[Customers|Previous]]</u> | <u>[[ | + | |
| + | ==Creating a customer== | ||
| + | |||
| + | [[File:Customer Creation.mp4|thumb|none|800px|(Click to watch video) 👀]] | ||
| + | |||
| + | <center><u>[[Customers|Previous]]</u> | <u>[[Accounts - Add & Import|Next]]</u></center> | ||
<br> | <br> | ||
---- | ---- | ||
Latest revision as of 18:03, 15 December 2020
Home FAQ page SmartBilling 5.0
Accounts
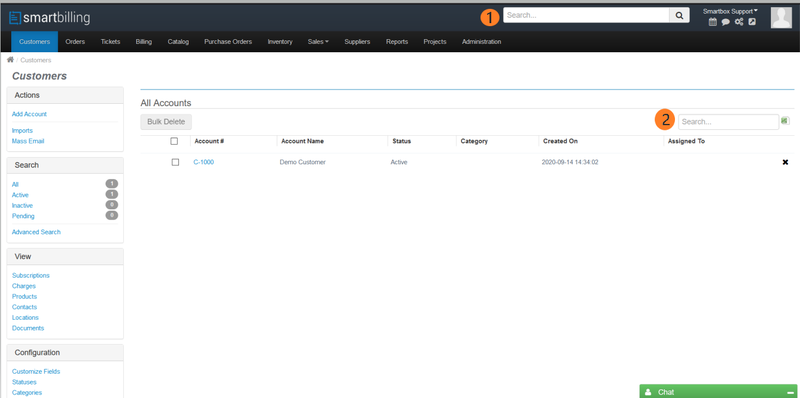
The navigation on the Customer Account List View screen is rich. The UI screen has two search boxes: (1) a ‘global’ search bar that does a general search within the entire SmartBilling database, and (2) a ‘local’ search bar that is limited to the displayed list of accounts.
Within the displayed list, you can view individual customers by clicking on the blue ‘Account #’ values; you can also delete customers if no transactions have been created for them (e.g. posted invoices, payments, credit notes, etc.) by clicking the ‘x’ icon to the right of the account row.
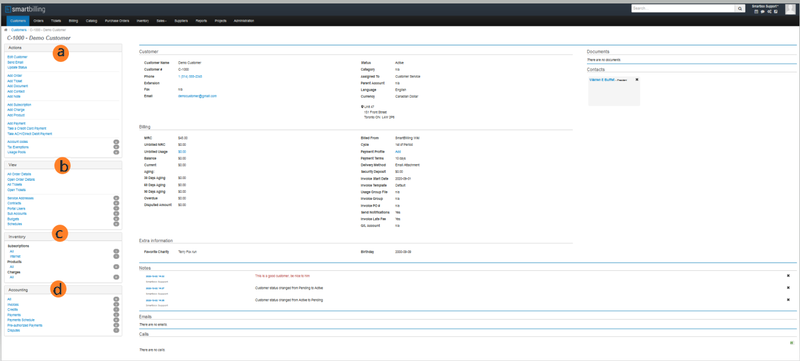
You can also configure the account information that you collect and store by adding custom fields. SmartBilling adapts to your business needs and allows you to add custom fields to most objects that SmartBilling defines. You can configure the accounts fields that are important for your business and manage them.
Let´s look at the most important functionalities starting with the Customer Configuration:
Creating a customer

